![709081_APP-Logo White_042920-2.png]](https://knowledge.agencyperformancepartners.com/hs-fs/hubfs/709081_APP-Logo%20White_042920-2.png?width=50&height=50&name=709081_APP-Logo%20White_042920-2.png)
Renewal List Timing:
- Commercial Lines list should be generated 120 days in advance of the Renewal date.
- Personal Lines List should be generated 60 days in advance of the Renewal date.
Note: The list should be generated during the first week of every month and separate reports should be generated for Commercial and Personal Lines.
Steps to Create Monthly Renewal Lists
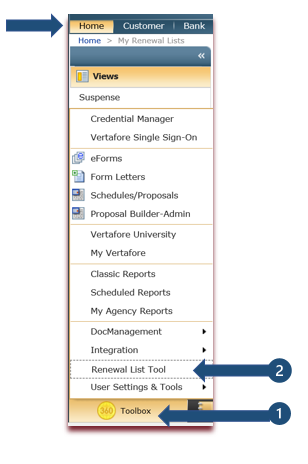
To open the Renewal List Tool, start from the AMS 360 Home Center:
- Select Toolbox and
- Renewal List Tool
Once the Renewal List Tool Window is open, make the following selections to create the Renewal Reports:

3. Expiration Date Range:
Reports are generated monthly, one month at a time. In the Expiration Date Range Criteria box, use Select Dates as this option allows you to choose a specific month. The first time the electronic list is generated; The From: date should be the first day of the renewal month needed and the To: date should be the last day of that month. Note: When generating future lists, the From Date should be up to 6 months prior to the renewal month but not prior to the From: date for the first list generated. Example: If electronic list was generated for the first time for August 2020, the dates would be 8/01/2020 to 8/31/2020. When the list for September is generated the dates should read 8/01/2020 to 9/30/2020. Once the from date is 6 months prior to the Renewal month, you can begin moving the from date forward. Exp: 9/01/2020 to 3/31/2020.
4. Type of Business:
For Commercial Lines Renewal Lists, use the drop-down box to choose Commercial Lines.
For Personal Lines Renewal Lists, use the drop-down box to choose Personal Lines.
5. Display:
Select “Only display the policies are not on existing renewal list(s).”
6. Responsible:
Responsible party is the person generating the list for distribution and the list will be viewable in his/her “My Renewal Lists” view in the Home Center.
7. The List CC:
Select from the drop down, the employees who should receive a copy of this list for management purposes.
8. Policy Assign To:
The Policy Assign To field will default to REP and will distribute the list by the REP on the policy.
9. Description:
Add the Report Description as shown above indicating the year, month, and type of expiration list.
10. Run List
When all fields are complete select Run List. This will generate the list and present a viewable grid of renewal policies as shown on the next page.
11. Send the Renewal List
When the list generates, select Send to “Assign To” Employee. Please see below
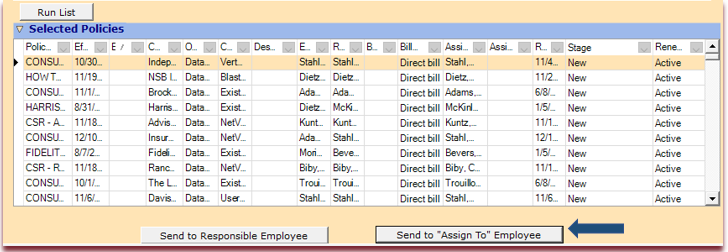
Once you have selected Sent to “Assign To” Employee, you will need to close the window with the X found at the top right of the window. 
Viewing the Monthly Renewal Lists
The list is now viewable in two locations:
- My Renewal List View in the Home Center for the Responsible party and anyone that is CC:d on the list. This view should be utilized by the Renewal List Administrator and Management.
- My Expiring Policy View in the Home Center for the “Assign To” employee. This view should be utilized for Account Managers.
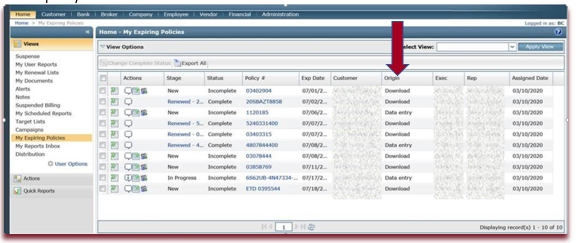
Downloaded Policies Versus Non-Downloaded Policies
The sample below is the My Expiring Policies view located in the Home Center. The Origin column shows the method of entry for the expiring policy.
Downloaded = Expiring policy was downloaded into the system by the carrier and the renewal policy is also downloadable.
Data Entry = Expiring policy was manually entered by the Account Manager and is not likely a downloadable policy at renewal.